

I am lucky to be able to spend my time evaluating movement patterns in our Motion Analysis Laboratory. We can get detailed joint angles and forces that are accurate down to the millimeter, degree and Newton. While this is great for research, our assessments do not always translate to the clinic. We are continually trying to develop clinically viable methods of patient assessment that correspond to what we do in the motion lab. The previous post we discussed using the Wii Balance Board to measure force symmetry during squatting and sit-to-stand tasks. Recently, a colleague pointed me to an open-source, free software program that was capable of taking video files and performing basic two-dimensional motion analysis.
Motion Analysis Software Output:
I remember when I was in PT school having to do an assignment for our kinesiology class. We had to choose a motion and then describe that motion with respect to joint angles and velocities. I decided to do a volleyball serve. First, I had to take pictures of my roommate performing this action. Because I needed pictures of different portions of this action, I needed my roommate to perform the motion 15 or 20 times while i tried to capture different phases of the serve. After this I had to take the film (yes this was the 90’s) to our local photo developer. A few days later I got the pictures back, threw away the ones that were out of focus or taken too late or too early, and sorted through the remaining ones. I put them in order and painstakingly identified joint centers on each picture. Using a protractor, I measured the angles of the elbow, shoulder, hips, and knees on each picture. I estimated the time it took to complete the task to make some inferences about angular velocities. After all of that, I got a “B” on the project.
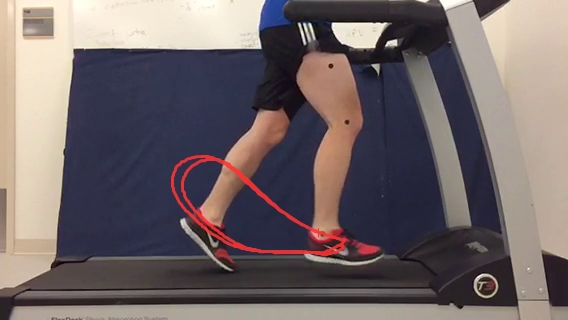
A few months back, my colleague told me about Kinovea Software (Kinovea.org). I had not tried it until this week. On Monday, I decided to test it out. I had my graduate student run on the treadmill in the lab and we placed some black stickers on his thigh, knee and ankle to identify joint centers and bony segments. We took 5 seconds of video on our phone, uploaded to the computer, imported it into the software, and within 5 minutes were able to calculate joint angles, velocities, displacement, accelerations, etc. I was amazed.
Learning the software was pretty easy. The tutorials cover the basics, but if you want to learn how to do the fun stuff, you are going to have to spend some time playing around with it for a bit. There was not much documentation online. I downloaded the experimental version (0.8.24), which offers a little bit more than the previous version. What I found particularly useful was being able to enter the actual frame rate of the camera, as well as being able to calibrate distances on the video. If you have an object of known length (like the length of the shoe, or distance between the markers) you can actually measure distances and speeds in usable units, like meters or meters per second (rather than pixels). Below is an example of the vertical ankle acceleration from the running video shown above. The image below that is a screenshot of the tracking of that marker during the video. Vertical acceleration of the leg be a good measure to calculate if you are trying to retrain running mechanics to reduce impact stresses (think patellofemoral pain, foot pain, tendonitis, etc.).

There are certainly limitations to this program. It is two dimensional. Its certainly less accurate than motion analysis laboratories. However, this software, combined with slow-motion video, is definitely a winner. The new Iphone can take 240 Frames Per Second with a 720 resolution. Next post I will discuss some of the cameras that can be used for capturing slow motion videos. I will do a side by side comparison of several phone videos and some point and shoots.
Sumayah
May 18, 2015 -
Thanks Dr. Zeni for the mention about this nice software..It is amazing and I believe this will be a great tool for my students projects!!